


Turn a Christmas Ornament Into a Custom Lamp Finial
Difficulty: Novice
Time: 30 minutes
Cost: ~$8
Why You'll Like This
Got a Christmas ornament that's lost its holiday magic? Transform it into a functional lamp finial that works year-round! This simple repurposing project turns forgotten decorations into stylish lighting accents in just half an hour. Here's the thing—most people never think twice about their lamp finial (that's the decorative piece that screws onto the top to hold your lampshade in place). But switching out this little detail can completely change how your lamp looks and transform the entire feel of your room. Plus, it's completely reversible if you want to change it up later or swap it seasonally.
What You'll Need
Materials
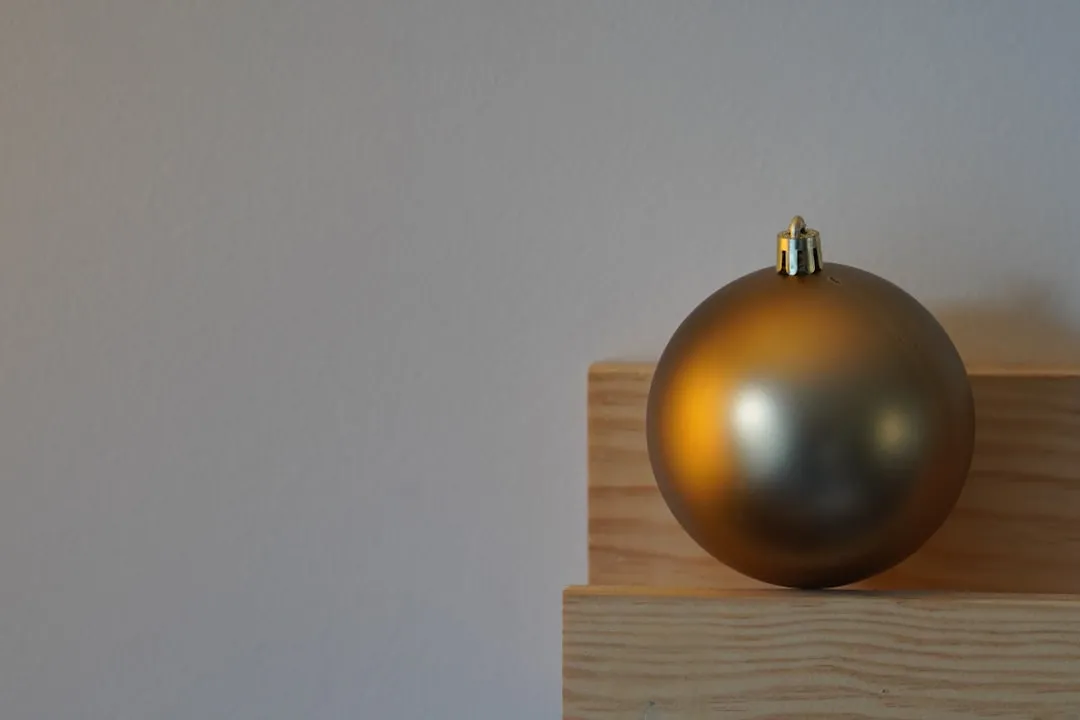
- 1 Christmas ornament (3-4 in./7.6-10.2 cm diameter works best)
- 1 tube strong epoxy or hot glue sticks
- 1 small threaded rod, 1/4 in. (6 mm) diameter (optional, for secure mounting)
- Spray paint, 1 can (optional, for color changes)
Tools
- Needle-nose pliers
- Small drill with 1/4 in. (6 mm) bit (if using threaded attachment)
- 220-grit sandpaper
- Small precision brush (for detail work)
- Hot glue gun (if using hot glue method)
Safety First
- Work in well-ventilated area when spray painting or using epoxy
- Wear safety glasses when drilling glass or ceramic ornaments
- Adult supervision required for kids using hot glue gun, drill, or spray paint
- Test paint on inconspicuous area first if keeping ornament's original finish
- Drill slowly on glass/ceramic to prevent cracking
Steps
-
Select the right ornament for lamp use. Not every Christmas ornament makes a good lamp finial—size and material matter. Look for ornaments with textured surfaces and interesting shapes that will catch light beautifully. Check proportions—your ornament should be roughly 1/6 to 1/4 the height of your lampshade for visual balance.
- Tip: Plastic ornaments offer durability and easy maintenance, making them ideal for frequently-used lamps.
-
Clean and remove all hanging hardware. Use needle-nose pliers to remove caps, hanging loops, and any decorative wire. Clean thoroughly with mild soap and water, then dry completely. This step ensures your paint and adhesive will bond properly.
-
Prep the surface for attachment. Lightly sand the area where you'll attach the ornament (usually the top or bottom). This creates better adhesion. Remove all dust with a damp cloth.
-
Paint if desired—this step transforms cheap ornaments into custom pieces. Light coats of spray paint work best on plastic ornaments. Painting the entire ornament in a single color creates a more elevated appearance. Apply 2-3 thin coats, letting each dry completely (about 15 minutes between coats).
- Tip: Add metallic accents to raised edges with a precision brush to enhance textured surfaces.
- If paint runs: It's too thick—sand lightly when dry and apply thinner coats.
-
Choose your attachment method based on ornament weight. For lightweight plastic ornaments under 2 oz (57g): use strong epoxy or hot glue to bond the ornament directly to the lamp's threaded post. This quick method works perfectly for most decorative applications.
-
For heavier ornaments (glass, ceramic, or large pieces): use the threaded rod method. Drill a small hole in the ornament's base and use a threaded rod for attachment. Drill slowly with steady pressure—rushing creates cracks. The hole should be just slightly smaller than your threaded rod diameter.
- If drilling cracks your ornament: Switch to the adhesive method and use the largest uncracked section as your base.
-
Make the final attachment and test stability. Apply adhesive or insert threaded rod, ensuring everything aligns straight. For adhesive: hold firmly for 30 seconds, then let cure per manufacturer's instructions. For threaded attachment: hand-tighten snugly but don't over-torque. Test by gently wiggling—it should feel solid.
Why it works: Most modern lamps have harps that accommodate the same size finials, so Christmas ornaments—designed to be decorative and lightweight—are perfect candidates for this standard threading system.
Cleanup & Disposal
- Store leftover paint in original containers for touch-ups
- Clean brushes with appropriate solvent immediately
- Dispose of paint-soaked rags safely—lay flat to dry before disposal (they can spontaneously combust if bunched up)
- Save any extra ornaments for future lamp projects or seasonal swaps
Troubleshooting
Problem: Ornament feels loose on the lamp → Fix: Add more adhesive around the base, or wrap the threaded connection with thin electrical tape for a tighter fit
Problem: Paint looks streaky or uneven → Fix: Sand lightly with 220-grit paper and apply thinner coats; always spray in light, overlapping passes
Problem: Finial looks disproportionate to lampshade → Fix: Check that the height is in proper proportion to the shade and lamp height for the best aesthetic look—aim for finials that are 1/6 to 1/4 the shade height
Variations & Upgrades
- Seasonal swaps: Change out finials for different seasons or holidays to add another dimension to your home decor
- Budget version: Use plastic dollar store ornaments—they're lightweight and perfect for practicing technique
- Elegant upgrade: Try vintage glass ornaments for sophisticated, light-refracting effects
FAQ
Can I use any type of ornament? Avoid ornaments with loose parts, sharp edges, or those made from materials that can't handle lamp heat (like certain plastics near incandescent bulbs).
Will this damage my lamp? No—you're only replacing the existing finial, which is designed to be removable and interchangeable.
Your lighting just got more interesting
This tiny change creates remarkable visual impact because these small details function as accent pieces that reinforce your interior design themes. What makes the ornament approach special is that you're repurposing items specifically designed to be beautiful and eye-catching—they already have the visual appeal finials need. The process allows for creative personalization based on your chosen materials and desired design, whether you prefer subtle elegance or bold statement pieces.
Now grab that forgotten ornament from your holiday storage and give your lamp the custom touch it deserves. You'll be amazed how this 30-minute project transforms not just your lamp, but your entire room's personality. That's the power of paying attention to the details everyone else overlooks.


Comments
Be the first, drop a comment!