



Celebrity florist Jeff Leatham says the instinct to grab more stems for a bigger bouquet is backwards. Repeating the flowers already in your hand can do more for an arrangement than piling on extra ones.
This guide walks through how to make a stunning flower bouquet using that same repetition idea, built by hand with a spiral technique that holds the stems together without wire or floral foam. Pick a tight color palette, choose flowers by role instead of by whim, then spiral them together in your hand the way florists do. Grocery store or garden flowers both work, and the main tools are a pair of sharp shears, some twine, and a vase to finish in.
Leatham leans on monochromatic palettes for a polished look, usually repeating two or three shades through an arrangement. According to CAE floristry expert Jane, color is the most important decision in building a bouquet.
What you'll need to make a stunning flower bouquet
Leatham says his own go-to essentials are floral shears, chicken wire, and floral tape. For a hand-tied bouquet without a vase, the shears matter most. It's recommended to use a sharp, clean knife or shears so stems get cut cleanly instead of crushed, which protects how well they take up water later.
For flowers, CAE's shopping formula keeps a bouquet from looking crowded or random: one type of mass flower, three to four types of secondary flowers, and one to two types of filler, plus a bit of foliage.
Mass (focal) flowers: large, shapely blooms that carry visual weight, like oriental lily, gerbera, or calla lily.
Secondary flowers: smaller blooms that build out the bulk of the bouquet, like rose, carnation, lisianthus, or chrysanthemum.
Filler flowers: clusters of tiny blooms that soften gaps and add fullness, like baby's breath, wax flower, or statice.
Foliage: greenery placed around the perimeter, which spreads the bouquet out and protects it.
That same list doubles as a shopping guide at the store. Look for one focal bloom with real presence, a secondary flower or two in a similar size range, and a filler that reads as texture rather than color, since it's going to repeat throughout the design rather than stand out on its own.
Before you start: picking a monochromatic flower arrangement and conditioning the stems
Pick one main color first, then add one or two nearby shades to repeat throughout. If the focal bloom is peach, keep the rest of the bouquet in cream, apricot, rust, or soft pink.
A true monochromatic flower arrangement sticks to one hue in several tones, blush, rose, and wine-red roses together, for example. Leatham's own fall palette runs a little broader: cream, orange, and deep red, carried through the flowers and anything nearby, like candles or linens.
CAE's rule simplifies the decision either way: start with a focal flower that already has built-in color variation, like a tulip or lily, then let that flower's own palette set the boundaries for every other stem added.
Once the colors are settled, condition the flowers before a single stem goes into the bouquet:
Trim about an inch off the bottom of each stem on a slant, right before it goes into water. An angled cut adds surface area for water uptake and keeps an air bubble from blocking the stem.
Strip off any leaves that would sit below the waterline. Submerged leaves rot and cloud the water quickly, which means changing it more often.
Give the flowers a little time in clean water before arranging. A stem straight from a dry wrap bends awkwardly and is harder to spiral evenly.
Skipping this step makes the spiral harder to form and shortens how long the finished bouquet holds up. If a bloom looks droopy right out of the wrapping, don't build with it yet; recut the stem on a slant and let it sit in water until it firms back up.
Step-by-step: how to arrange flowers in a bouquet using the spiral technique
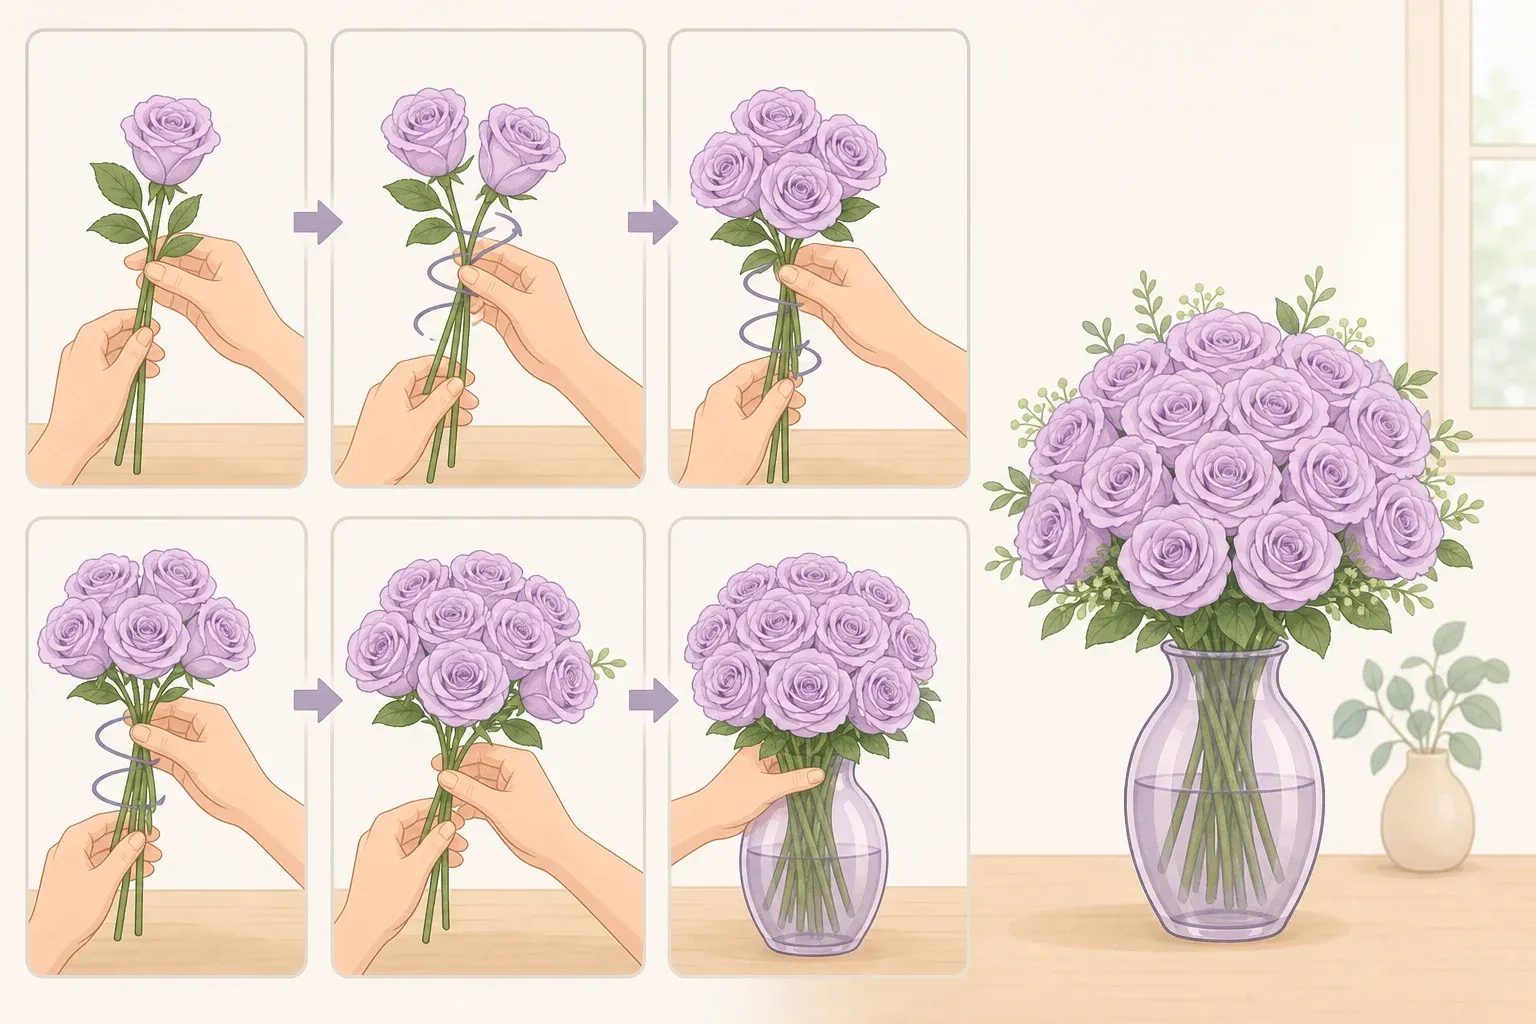
A hand-tied bouquet is simply flowers arranged in the hand with the stems aligned in a spiral. It's the skill that turns a bunch of cut flowers, store-bought or garden-grown, into something that looks professionally built.
Before starting, loop a length of twine around your neck so it's within reach the instant you're ready to tie off. It's a working florist's habit for keeping both hands free while building.
Hold the focal flower in your non-dominant hand, gripping the stem at the point where the bouquet will eventually be tied. That grip point stays fixed for the whole build, so pick a spot low enough to leave room for everything added after it.
With your other hand, add the next stem on a diagonal, crossing it over the first at that same grip point. Every new stem should cross in the same direction as the one before it; that consistency is what forms the spiral at the base.
Loosen your grip just enough to slide each new stem into place, then tighten it again before letting go. After three or four stems, give the bunch a quarter turn and check the front. If a bloom is facing inward or buried against your palm, turn it outward before adding the next stem.
Keep adding secondary flowers the same way, crossing on the same diagonal and rotating every three or four stems, building out the bulk of the bouquet around the focal flower.
Add filler flowers and foliage last, tucking them around the outer edge to soften the shape and fill any gaps.
Check the spiral from underneath. Stems should fan out evenly in a pinwheel pattern, not clump on one side. If they clump, loosen your grip and feed a few stems back in on the thin side.
Tie off at the grip point using the twine from around your neck, but leave the knot loose enough to adjust if the shape still needs work. Once the bouquet looks balanced from every angle, pull the tie snug.
Lay the bunch on a flat surface and trim the stems so the base sits level; that's what lets the bouquet stand on its own. Then give each stem a fresh slanted cut right at the tip. The level base keeps it stable; the angled cut keeps the stems taking up water.
Set the finished bouquet down to check it: it should stand without leaning, and the base should show a clear spiral pattern rather than a tangle of crossed stems.
DIY floral arrangement ideas: adapting for one bunch, garden flowers, or a vase
Working from a single bunch: if the only flowers on hand are one mixed grocery store bunch, the same role system applies. Pull out the largest or showiest bloom to anchor the center as the focal flower, group the next-largest blooms together as secondary, and use any small sprigs mixed into the bunch as filler and foliage.
Working from the garden: It is recommended to cut garden flowers near sunrise, when they're most hydrated, and bring a bucket or vase of water outside so stems go straight into water after cutting. If the flowers won't be arranged right away, hold them between 40 and 60°F for a day or two, or 33 to 35°F for longer storage; a refrigerator works fine for short-term holding. Stems that ooze a milky sap hold up better if the cut end is held over a flame for a few seconds to seal it, and woody stems, like lilac, sometimes need a second cut to take up water properly.
Building straight into a vase: if the flowers are going into a vase instead of being carried or handed off loose, skip the spiral. CAE's version builds the same bouquet in three layers: a dense center layer of mass and secondary flowers, a sparser middle layer of mostly secondary flowers with a little filler, and a loose outer layer of filler and foliage around the rim.
Fixing common mistakes: flower arranging tips for beginners
If the bouquet looks twisted or lopsided, check whether the stems were crossed in different directions instead of one consistent diagonal. Loosen the tie and refeed the stems that are crossing the wrong way, keeping each new stem crossing the same direction as the last.
If blooms end up facing sideways or away from the front, the fix is a quick turn: loosen the tie, rotate the misdirected flowers outward, and retie.
If the bouquet won't sit flat or even in a vase, check whether the stems were trimmed at different lengths. Lay the bunch on a flat surface after tying and trim the stems in one clean cut so the base lines up evenly, then finish with a fresh slanted cut at each tip.
Styling the table: how to create a chic floral arrangement for guests
The height of a table arrangement should match the setup, since line of sight matters more than the flowers themselves. "It really depends on how far the person is sitting," he says; for a smaller table where guests can talk at a normal volume, keep arrangements low enough to see across, while a louder, more spread-out table can handle taller arrangements because guests aren't trying to make eye contact anyway.
For a long table, Leatham suggests skipping one large centerpiece: line the table with several smaller arrangements of the same flower, or alternate florals with candles set at different heights. Repetition works at the table scale too, not just inside one bouquet.
Keeping the bouquet fresh after it's built
Too much sunlight, drafts, and heat cause flowers to lose more water than they take in, which speeds up wilting. Keep the finished bouquet away from all three.
Use a sturdy, clean vase deep enough to keep every stem submerged, and change the water whenever it turns cloudy or drops low.
Buy a floral preservative packet from a florist or garden center, since it's formulated with the right mix of sugar, acidifier, and bactericide to extend vase life. There's also a homemade option for when no packet is on hand: one pint of regular lemon-lime soda, one pint of water, a teaspoon of antiseptic mouthwash, and one or two drops of dish soap, in guidance published two years ago.
The right feeding and care routine can make flowers last up to twice their normal lifespan. However, homemade additives, mouthwash included, often underperform a real preservative and can even shorten vase life; if no preservative is on hand and the homemade mix feels uncertain, plain clean water without additives is the next best option.
Leatham prefers opaque vases in black, taupe, or ceramic over clear glass; he likes vessels that hide the water so he can arrange the flowers and leave them alone. Clear glass works too, he says, with one condition: committing to changing the water regularly. Choose whichever fits the room; if it's opaque, lift the vase or peek under the flowers to gauge the water level instead of checking through the sides, and keep to the same change schedule either way.
What success looks like, and how to keep it that way
A finished bouquet should show a clear two- or three-color story, one obvious focal point, and a base that sits flat with every stem holding water. If it still looks busy or unfocused, narrow the palette further or repeat one flower type more consistently; adding more stems rarely fixes it.
Recut stems about every third day and place them in fresh solution. Prompt water changes can make recutting unnecessary, since cutting stems underwater gets tricky once a bouquet is already arranged.
Stop adjusting once the focal flower is clearly visible, the chosen colors repeat at least twice through the bouquet, and every stem sits securely in water. There's no need to keep tucking in extra filler just to fill space.












Comments
Be the first, drop a comment!